Patric Johansson On Applied .NET

July 27, 2020

Table with new row highlighting using JavaScript

Filed under: Uncategorized — Patric Johansson @ 3:00 PM
Tags:

Briefly making new rows in a table stand out is an effective approach to draw users attentions to newly displayed data. We use JavaScript to update the style for rows in the HTML table. A timer is used to update the style with a fixed interval. In our example, we change the font color from red to default black.

<input type="button" value="Add order" onclick="onAddOrder()" />
<label> 
   <input type="checkbox" id="highlightCheckbox" onclick="onHighlight()" />
   Highlight
</label>

<table id="orderTable" />

We have in our HTML code a button to add new orders (randomly created), a checkbox to turn highlighting on or off and finally our table. To control highlighting we will shortly write two functions: startHighlighting and stopHighlighting. Rows need to be added with the function addRow.

var orderId = 1000;

function onAddOrder() {
    var order = {
        orderId: orderId++,
        productId: Math.floor(Math.random() * 1000) + 1,
        price: (Math.random() * 100).toFixed(1) + 0.01,
        quantity: Math.floor(Math.random() * 100) + 1
    }
    addRow(order);
}

function onHighlight() {
    var highlightChecked = document.getElementById("highlightCheckbox").checked;
    if (highlightChecked) {
        startHighlighting();
    }
    else {
        stopHighlighting();
    }
}

Event handler onAddOrder creates a new order and adds it to the table using the yet to be defined addRow function. onHighlight turns on and off highlighting in the table. For example, when table is initially populated with a large set of rows, it might not be annoying to highlight all rows.

<style>
        tr {
            color: black;
        }
        .highlight5 {
            color: #FF0000; 
        }
        .highlight4 {
            color: #CC0000;
        }
        .highlight3 {
            color: #990000;
        }
        .highlight2 {
            color: #660000;
        }
        .highlight1 {
            color: #330000;
        }
    </style>

CSS styling is used for level of highlighting, we have 5 levels plus default, from red to black, creating the illusion that the new, red hot row cools down to black.

var tableId = "orderTable";
var highlightTimer = undefined;        
        
function addRow(obj) {
    var table = document.getElementById(tableId);
    if (table.rows.length == 0) {
        var headerRow = table.insertRow(0);
        for (propName in obj) {
            var headerCell = document.createElement("th");
            headerCell.innerHTML = propName;
            headerRow.appendChild(headerCell);
        }
    }
    var row = table.insertRow(-1);
    if (highlightTimer != undefined) {
        row.setAttribute("class", "highlight5");
    }
    for (propName in obj) {
        var cell = row.insertCell(-1);
        cell.innerHTML = obj[propName];
    }
};

function startHighlighting () {
    highlightTimer = setInterval(highlight, 1000);
};

function stopHighlighting () {
    clearInterval(highlightTimer);
    highlightTimer = undefined;
    var table = document.getElementById(tableId);
    var trList = table.getElementsByTagName("tr");
    for (var i = 1; i < trList.length; i++) {
        var trElement = trList.item(i);
        trElement.removeAttribute("class");
    }
};

function highlight() {
    var table = document.getElementById(tableId);
    var trList = table.getElementsByTagName("tr");

    for (var i = 1; i < trList.length; i++) {
        var trElement = trList.item(i);
        var attribute = trElement.getAttribute("class");
        switch (attribute) {
            case "highlight5":
                trElement.setAttribute("class", "highlight4");
                break;
            case "highlight4":
                trElement.setAttribute("class", "highlight3");
                break;
            case "highlight3":
                trElement.setAttribute("class", "highlight2");
                break;
            case "highlight2":
                trElement.setAttribute("class", "highlight1");
                break;
            case "highlight1":
            default:
                trElement.removeAttribute("class");
                break;
        }
    }
}

Function addRow adds a header row if table is empty using property names of given object. Next it insert the new row last in table. If highlighting is enabled, it set its CSS class to highlight5. startHighlighting starts the timer needed to update the style of the row and stopHighlighting stops the timer as well as clear the CSS class of all rows that are still being highlighted.

Function highlight is used by the timer to update the style, from most highlighted to default styling. We get all rows (tr) for the table, next get the class attribute for the row. If row is being highlighted, we change it to the next level of highlighting, or if on lowest level, remove it all together.

Full source code can be found here.

July 17, 2020

Tic-Tac-Toe with JavaScript and MVC

Filed under: JavaScript — Patric Johansson @ 4:46 PM
Tags: ,
Tic-Tac-Toe game

Tic-Tac-Toe is a fairly easy game to implement. This version is played by two users (X and O) and allows boards of various sizes. Also, number of marks in row needed to win can be set. In above screenshot, we have a 6×6 board and four marks are needed to win. X is next and with the right move can end the game.

The HTML and CSS code is simple, a table for the board and two CSS classes to display images for X (markX) and O (markO). The cells (td) are fixed size and added using JavaScript.

<!DOCTYPE html>
<html lang="en">
<head>
    <meta charset="utf-8">
    <title>Tic-Tac-Toe</title>
    <style>
        table {
            background: url("background.jpg");
            background-size: contain;
            width: auto;
            height: auto;
            border: 5px solid black;
            border-spacing: 0px;
            padding: 0;
            margin: 0;
        }
        td {
            width: 50px;
            height: 50px;
            border: 5px solid black;
            border-spacing: 0px;
            padding: 0;
            margin: 0;
        }
        .markX {
            background: url("x.png");
            background-size: contain;
        }
        .markO {
            background: url("o.png");
            background-size: contain;
        }
    </style>
</head>
<body>
    <select id="lengthComboBox" onchange="onchangeLengthCombobox()">
        <option value="3" selected="selected">3x3</option>
        <option value="4">4x4</option>
        <option value="5">5x5</option>
        <option value="6">6x6</option>
        <option value="7">7x7</option>
        <option value="8">8x8</option>
        <option value="9">9x9</option>
    </select>
    <select id="marksInRowNeededComboBox" onchange="restartGame()">
        <option value="3" selected="selected">3</option>
    </select>
    <input type="button" id="restartButton" value="Start over!" onclick="restartGame()">
    <table id="boardTable" />
    <script src="TicTacToe.js"></script>
</body>
</html>

The behavior is all in JavaScript, including some DOM manipulation. We start with some event handlers, to hook up to our comboboxes and button. The number of marks in row needed is dependent on the size of the board, must be less than or equal. Not possible to get 4 in a row on a 3×3 board for example. We use updateMarksInRowNeededComboBox function of the view object to update the combobox to set number of marks in row to win.

// Event Handlers
window.onload = restartGame;

function restartGame() {
    controller.restartGame();
}

function onchangeLengthCombobox() {
    view.updateMarksInRowNeededComboBox();
    controller.restartGame();
}

The view object is responsible for getting user inputs and updating the UI. Since we follow the MVC patters, the view can access the model object. The generateBoard function clears the table (with id boardTable) and adds new cells. The cells have ids that correspond to their position (x, y) in the grid in the form of x:y, for example 3:5. We use the string split function to get x and y from a cell id.

Various mouse events are hooked up to the cells in order to provide highlighting on mouse over and add a mark on mouse click. Function highlightMarks is used to make some cells appear dimmed so winning marks in row stand out. Functions displayMark and hideMark are used for showing the mark on mouse over.

// View
var view = {
    getBoardLengthInput: function () {
        var lengthComboBox = document.getElementById("lengthComboBox");
        var length = lengthComboBox.options[lengthComboBox.selectedIndex].value;
        return parseInt(length);
    },
    getMarksInRowNeededInput: function () {
        var marksInRowNeededComboBox = document.getElementById("marksInRowNeededComboBox");
        var marksInRowNeeded = marksInRowNeededComboBox.options[marksInRowNeededComboBox.selectedIndex].value;
        return parseInt(marksInRowNeeded);
    },
    generateBoard: function () {
        var table = document.getElementById("boardTable");
        for (var i = table.rows.length - 1; i >= 0; i--) {
            table.deleteRow(i);
        }
        for (var y = 0; y < model.board.length; y++) {
            row = table.insertRow(y);      
            for (x = 0; x < model.board.length; x++) {
                var cell = row.insertCell(x);
                cell.id = x + ":" + y;
                cell.onclick = this.placeMark;
                cell.onmouseenter = this.displayMark;
                cell.onmouseleave = this.hideMark;
            }
        }
    },
    updateMarksInRowNeededComboBox: function () {
        var marksInRowNeededComboBox = document.getElementById("marksInRowNeededComboBox");
        for (var i = marksInRowNeededComboBox.length - 1; i >= 0; i--) {
            marksInRowNeededComboBox.remove(i);
        }
        for (var i = 3; i <= view.getBoardLengthInput(); i++) {
            var option = document.createElement("option");
            option.value = i;
            option.text = i;
            if (i == 3) {
                option.selected = "selected";
            }
            marksInRowNeededComboBox.add(option);
        }
    },
    highlightMarks: function (marks) {
        for (var y = 0; y < model.board.length; y++) {
            for (var x = 0; x < model.board.length; x++) {
                if (!marks.includes(x + ":" + y)) {
                    var cell = document.getElementById(x + ":" + y);
                    cell.style.opacity = "0.25";
                }
            }
        }
    },
    placeMark: function (e) {
        var coords = e.target.id.split(":");
        var x = parseInt(coords[0]);
        var y = parseInt(coords[1]);
        controller.placeMark(x, y);
    },
    displayMark: function (e) {
        var coords = e.target.id.split(":");
        var x = parseInt(coords[0]);
        var y = parseInt(coords[1]);
        if (model.isFree(x, y) && !model.isLocked) {
            var cell = document.getElementById(x + ":" + y);
            if (model.nextPlayer == "X") {
                cell.setAttribute("class", "markX");
            }
            else {
                cell.setAttribute("class", "markO");
            }
        }
    },
    hideMark: function (e) {
        var coords = e.target.id.split(":");
        var x = parseInt(coords[0]);
        var y = parseInt(coords[1]);
        if (model.isFree(x, y)) {
            var cell = document.getElementById(x + ":" + y);
            cell.removeAttribute("class");
        }
    }
}

The model object holds our data, the game board and which user is next. The model is self contained and have no knowledge of the view or controller. The board is an array of arrays, since JavaScript don’t support two dimensional arrays.It has some fairly complicated logic to check if a move resulted in a win, function isWin. Once the board is full or a user won, we set isLocked to true which will stop user interaction with the board until game is restarted.

// Model
var model = {
    board: new Array(),
    nextPlayer: "O",
    isLocked: false,
    isFree: function (x, y) {
        var mark = this.board[x][y];
        return mark == undefined;
    },
    placeMark: function (x, y, mark) {
        this.board[x][y] = mark;
    },
    isWin: function (x, y, mark) {
        if (this.board[x][y] != mark) {
            return [];
        }

        var marksInRowNeeded = view.getMarksInRowNeededInput();   
        var winningMarksArr = [];

        for (var i = 0; i < this.board.length; i++) {
            if (this.board[i][y] == mark) {
                winningMarksArr.push(i + ":" + y);
            }
            else {
                winningMarksArr = [];
            }
            if (winningMarksArr.length == marksInRowNeeded) {
                return winningMarksArr;
            }
        }
        winningMarksArr = [];
        for (var i = 0; i < this.board.length; i++) {
            if (this.board[x][i] == mark) {
                winningMarksArr.push(x + ":" + i);
            }
            else {
                winningMarksArr = [];
            }
            if (winningMarksArr.length == marksInRowNeeded) {
                return winningMarksArr;
            }
        }
        winningMarksArr = [];
        var minX = x - Math.min(x, y);
        var minY = y - Math.min(x, y);
        var maxX = x + this.board.length - Math.max(x, y) - 1;
        for (var i = 0; i <= maxX - minX; i++) {
            if (this.board[minX + i][minY + i] == mark) {
                winningMarksArr.push((minX + i) + ":" + (minY + i));
            }
            else {
                winningMarksArr = [];
            }
            if (winningMarksArr.length == marksInRowNeeded) {
                return winningMarksArr;
            }
        }
        winningMarksArr = [];
        minX = x - Math.min(x, this.board.length - y - 1); 
        minY = y - Math.min(y, this.board.length - x - 1);
        maxX = x + Math.min(y, this.board.length - x - 1);
        maxY = y + Math.min(x, this.board.length - y - 1);
        for (var i = 0; i <= maxX - minX; i++) {
            if (this.board[maxX - i][minY + i] == mark) {
                winningMarksArr.push((maxX - i) + ":" + (minY + i));
            }
            else {
                winningMarksArr = [];
            }
            if (winningMarksArr.length == marksInRowNeeded) {
                return winningMarksArr;
            }
        }
        return [];
    },
    isBoardFull: function () {
        for (var i = 0; i < this.board.length; i++) {
            for (var j = 0; j < this.board.length; j++) {
                if (this.board[i][j] == undefined) {
                    return false;
                }
            }
        }
        return true;
    },
    generateBoard: function(length) {
        var arr = new Array(length);
        for (var i = 0; i < length; i++) {
            arr[i] = new Array(length);
            for (var j = 0; j < length; j++) {
                arr[i][j] = undefined;
            }
        }
        this.board = arr;
    }
};

Finally, our controller, is in charge of game flow and rules. It reacts on user input from the view object and updates the model accordingly. Function placeMark is run whenever user clicks on a free cell. It checks that it is an allowed move, then updates the model. Next it checks with model if we have a win or full board and if so, commands the view to display this using function highlightMarks.

// Controller
var controller = {
    restartGame: function () {
        var boardLength = view.getBoardLengthInput();
        model.generateBoard(boardLength);
        model.nextPlayer = "O"
        model.isLocked = false;
        view.generateBoard();
    },
    placeMark : function (x, y) {
        if (!model.isFree(x, y) ||
            model.isLocked) {
            return;
        }

        model.placeMark(x, y, model.nextPlayer);
        var winningMarksArr = model.isWin(x, y, model.nextPlayer);
        if (winningMarksArr.length > 0) {
            view.highlightMarks(winningMarksArr);
            model.isLocked = true;
        }
        else if (model.isBoardFull()) {
            view.highlightMarks([]);
            model.isLocked = true;
        }
        else {
            model.nextPlayer = model.nextPlayer == "O" ? model.nextPlayer = "X" : model.nextPlayer = "O";
        }
    }
}

Full source code can be found here.

May 25, 2015

ASP.NET MVC: Proper model binding with dynamic form

Filed under: ASP.NET MVC,C#,JQuery — Patric Johansson @ 10:04 PM
Tags: , ,

ASP.NET MVC automatically maps values entered in a form by a user to properties of a ViewModel object. This is done by matching property names to field names and is commonly known as model binding. Correctly done it will aid in decoupling your controller from a view.

We will use an employee database as our domain. The goal is to allow us to create employees with a name and phone numbers. Let’s start with an EmployeeViewModel class with a Name and a PhoneNumber property.

public class EmployeeViewModel
{
    public string Name { get; set; }
    public string PhoneNumber { get; set; }
}

Next we need a form defined in view Create.cshtml with appropriately named fields to automatically create an EmployeeViewModel object.

@model EmployeeDemo.Models.EmployeeViewModel

<form action="/Employees/Create" method="post">
    <p>
        Name
        <input type="text" name="Name">
    </p>
    <p>
        Phone Number
        <input type="text" name="PhoneNumber" />
    </p>
    <p>
         <input type="submit" name="btnSubmit" value="Create new employee" />
</p>
</form>

Notice that the names of the HTML fields matches the names of the viewmodel properties. In the EmployeesController we would have a Create post method which takes the viewmodel as argument.

// POST: Employees/Create
[HttpPost]
public ActionResult Create(EmployeeViewModel employeeViewModel)
{
    if (!ModelState.IsValid)
    {
        return View("Create", employeeViewModel);
    }

    // Save the created employee object

    return RedirectToAction("Index");
}

Model binding can also handle nested objects. Let’s introduce a Phone class to demonstrate.

public class EmployeeViewModel
{
    public string Name { get; set; }
    public Phone PrimaryPhone { get; set; }
} 

public class Phone
{
    public enum Types
    {
        Business,
        Cell, 
        Home
     }
     public Types Type { get; set; }
     public string Number { get; set; }
}

We need to modify our form to allow users to input phone type. We will use a dropdown list (select field) to enter phone type. Notice the names of the phone fields specifying how they are nested.

@model EmployeeDemo.Models.EmployeeViewModel
Name
Phone Type Business
Cell
Home
Phone Number

No changes will need to be done to our controller. The controller is not tightly coupled to the view.

A straightforward requirement for an Employee class would be multiple phone numbers. Let us start with allowing users to enter two phones for an employee. Phone class is defined as above. We add a collection property of Phone objects to EmployeeViewModel class.

public class EmployeeViewModel
{
&amp;nbsp;&amp;nbsp;&amp;nbsp; public string Name { get; set; }
&amp;nbsp;&amp;nbsp;&amp;nbsp; public List&amp;lt;Phone&amp;gt; Phones { get { return _phones; } }
&amp;nbsp;&amp;nbsp;&amp;nbsp; private List&amp;lt;Phone&amp;gt; _phones = new List&amp;lt;Phone&amp;gt;();
}

Our form needs now two sets of fields for defining phone numbers.

@model EmployeeDemo.Models.EmployeeViewModel
Name
Phone Type Business
Cell
Home
Phone Number
Phone Type Business
Cell
Home
Phone Number

The model binding will create a List with two phones. It is important that names have consecutive indexes or model binding will not work properly. Allowing only a fixed number of phones in our form is not a practical solution, we need to allow user to add any number of phones, meaning zero or more. For this we will use jQuery to allow client-side logic for adding and removing fields in our form depending on number of phones for a given employee.

We will need two jQuery functions, one for adding rows and one for removing rows. We will add links for user to add and remove rows. A row will consists of fields for entering one phone with a phone type and number.

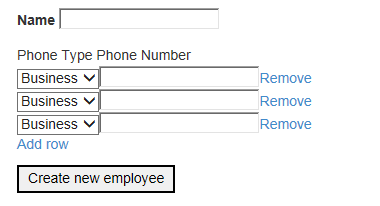
Let’s see an image of our form in action. In the image we can see that the user wants to create an employee with three phones.
EmployeeForm

The add function will append a new row to bottom of the list of phones. It will get index to use for field names by counting existing rows.

The remove function will remove the row with the clicked Remove link as well as rename all remaining field names using consecutive indexes. As mentioned before, names of fields need to have consecutive indexes.

The view for the create action uses HtmlHelper methods for HTML generation. The div with id phoneList is the list of phones. It contains zero or more divs of class phoneRow which contains the dropdown list and input field.

@using EmployeeDemo.Models;
@model EmployeeDemo.Models.EmployeeViewModel

&amp;lt;form action="/Employees/Create" method="post"&amp;gt;
    &amp;lt;p&amp;gt;
        @Html.LabelFor(model =&amp;gt; model.Name)
        @Html.TextBoxFor(model =&amp;gt; model.Name)
    &amp;lt;/p&amp;gt;

    &amp;lt;div id="phoneList"&amp;gt;
        @if (Model.Phones.Count &amp;gt; 0)
        {
            &amp;lt;span&amp;gt;Phone Type Phone Number&amp;lt;/span&amp;gt;
        }

        @for (int i = 0; i &amp;lt; Model.Phones.Count; i++)
        {
            &amp;lt;div class="phoneRow"&amp;gt;
                @Html.DropDownList("Phones[" + i + "].Type", Model.Phones[i].PhoneTypeSelectListItems, new { @class = "phoneType" })
                @Html.TextBoxFor(model =&amp;gt; Model.Phones[i].Number, new { @class = "phoneNumber" })
                &amp;lt;a href="javascript:void(0);" class="remRow"&amp;gt;Remove&amp;lt;/a&amp;gt;
            &amp;lt;/div&amp;gt;
        }
    &amp;lt;/div&amp;gt;

    &amp;lt;p&amp;gt;
        &amp;lt;a href="javascript:void(0);" class="addRow"&amp;gt;Add row&amp;lt;/a&amp;gt;
    &amp;lt;/p&amp;gt;

    &amp;lt;p&amp;gt;
        &amp;lt;input type="submit" name="btnSubmit" value="Create new employee" /&amp;gt;
    &amp;lt;/p&amp;gt;

&amp;lt;/form&amp;gt;

PhoneTypeSelectListItems is a new property on our Phone class which returns the enum for phone types as a list of SelectListItems. We also add some data validations attributes to the properties of the class.

public class Phone
{
    public enum Types
    {
        Business,
        Cell,
        Home
    }

    [Required]
    public Types Type { get; set; }

    [Required]
    [Phone]
    public string Number { get; set; }

    public IEnumerable&amp;lt;SelectListItem&amp;gt; PhoneTypeSelectListItems
    {
        get
        {
            foreach(Types type in Enum.GetValues(typeof(Types)))
            {
                SelectListItem selectListItem = new SelectListItem();
                selectListItem.Text = type.ToString();
                selectListItem.Value = type.ToString();
                selectListItem.Selected = Type == type;
                yield return selectListItem;
            }
        }
    }
}

When the Create view is first opened, Model.Phones.Count is zero. Model.Phones.Count will only be non-zero after user hit submit with an invalid model state, for example empty name or invalid phone number. Let’s take a look at our jQuery functions for adding and removing rows in the form.

&amp;lt;script type="text/javascript" src="../../Scripts/jquery-1.10.2.min.js"&amp;gt;&amp;lt;/script&amp;gt;
&amp;lt;script type="text/javascript"&amp;gt;

$(document).ready(function () {

    $(".addRow").click(function () {

        var rowCount = $('.phoneRow').length;
        $("#phoneList").append('&amp;lt;div class="phoneRow"&amp;gt;&amp;lt;select name="Phones[' + rowCount + '].Type" class="phoneType"&amp;gt;@foreach (SelectListItem item in new Phone().PhoneTypeSelectListItems){&amp;lt;option value="@item.Value"&amp;gt;@item.Text&amp;lt;/option&amp;gt;}&amp;lt;/select&amp;gt;&amp;lt;input type="text" name="Phones[' + rowCount + '].Number" class="phoneNumber" /&amp;gt;&amp;lt;a href="javascript:void(0);" class="remRow"&amp;gt;Remove&amp;lt;/a&amp;gt;&amp;lt;/div&amp;gt;');
    });

    $("#phoneList").on('click', '.remRow', function () {

        $(this).closest('.phoneRow').remove();

        $('.phoneType').each(function (index) {
            $(this).attr('name', 'Phones[' + index + '].Type');
        });

        $('.phoneNumber').each(function (index) {
            $(this).attr('name', 'Phones[' + index + '].Number');
        });
    })
});

&amp;lt;/script&amp;gt;

The addRow function appends some HTML for a new phoneRow div to the phoneList div. This HTML is the same as generated by our HtmlHelper methods used in the form. The new fields will have names with an index equal to existing number of phoneRow divs so we have consecutively named fields. The remRow function removes the phoneRow div it belongs to. Next it iterates over all fields and renames them so we get consecutively named fields. It finds them using class names phoneType and phoneNumber.

Usually when working with dynamic forms and lists, a FormCollection object is used to get field values in the controller method. The Create method in the EmployeesController would look something like this:

// POST: Employees/Create
[HttpPost]
public ActionResult Create(FormCollection formData)
{
    string name = formData["Name"];
    string phones0Type = formData["Phones[0].Type"];
    string phones1Number = formData["Phones[0].Number"];
    . . .

The drawback is of course that we now need to construct our EmployeeViewModel from a string collection and cast it to correct type. Any changes to EmployeeViewModel or form will break the controller method, like changing Name property to first and last name properties. Instead, with just some minor work in the form making sure that all fields have proper names and relying on ASP.NET MVC model binding, we get a fully constructed object and a controller which is not tightly coupled to its view.

On the web there are many examples how to do a dynamic list in a form, but all I seen rely on using an HTML table instead of nested divs. Tables are for tabular data and not for layout. A list of fields is not tabular data so we use nested divs instead.

CSS styling of any kind is intentionally left out, in order to focus on model binding using dynamic forms.

The attached Visual Studio 2013 C# solution contains the above code with some minor additions. Validation messages are displayed. The EmployeeViewModel class has an additional ID property. Beside the Create view we also have an Edit view for editing employees. The form is identical to the Create view, but added for to give demonstrate how edit is done with model binding. An Index view is the Home view for viewing employees and contains links to create and edit employees. There’s no true model for storing employees and no checks that a requested employee exists, employees are stored in a list and we assume employee ID is the index for that employee object in the list.

Download full VS2013 project

July 13, 2013

Simple JQuery expander

Filed under: JQuery — Patric Johansson @ 2:23 PM
Tags:

Image
Figure: simple expander using jQuery

<html>
  <head>

  <script src="Scripts/jquery-1.7.1.js"></script>
  <script>
    $(document).ready(function () {
    $(".showHide").wrapInner("<div class=showHideContent></div>");
    $(".showHideContent").hide().before("<button class=showHideButton>Show</button>");
    $(".showHideButton").click(function (event) {
      if ($(event.target).next().is(":visible")) {
      $(event.target).next().hide();
      $(event.target).html('Show');
      }
      else {
      $(event.target).next().show();
      $(event.target).html('Hide');
      }
    });
    });
  </script>

  <style media="screen" type="text/css">
    .showHide
    {
      border: 2px solid black;
    }
  
    .showHideButton
    {
      width:100%;
      border-style: none;
    }
  </style>

  </head>
  <body>
  
  <div class="showHide">
	  <ul> 
		  <li>A</li>
		  <li>B</li>
		  <li>C</li>
	  </ul>
  </div>


  <div class="showHide">
    Some text	
  </div>


  <button>Random button</button> 

  </body>
</html>

The jQuery script adds a Show/Hide button to any html element of class showHide. User can click on button to expand or collapse the html element. I also added some simple CSS styling to show how it can be done.

The jQuery script wraps the content of any elements of class showHide with a div with class showHideContent. Next it inserts a button labeled Show before the inserted div. It also hides the inserted div.

We hook up a click event to the button. We get access to the button through the event.target property. Using $(event.target).next() we get access to the inserted div which is wrapped around the content. Remember the button was inserted before the div, so using the next() function on the button we get access to the div. Next we hide or show the div depending on if it is visible or not. We also update the label of the button.

Below is the result of the script for the list element in runtime.

<div class=showHide>
  <button class=showHideButton>Hide</button>
  <div class=showHideContent>
  <ul>
  <li>A</li> 
  <li>B</li> 
  <li>C</li>
  </ul>
  </div>
</div>

The above code assumes you put the JScript file for jQuery (jquery-1.7.1.js) in a folder called Scripts.

April 3, 2012

Download themes on demand in a Silverlight app

Filed under: C#,Silverlight — Patric Johansson @ 8:57 PM

A common requirement for Silverlight applications is to support multiple themes. However if the themes are part of the application they will increase the application’s size and the time to download it. The solution is of course to download the themes on demand and not at startup.

For themes we use the themes from the Silverlight toolkit. This sample project uses Visual Studio 10, .NET 4.0, Silverlight 5 and Silverlight toolkit. The result is a Silverlight application which allows users to select one of several themes which will then be downloaded from the web server.

Figure 1: The Theme demo application.

Create a new Silverlight application and website to host it in using the Silverlight Application template in Visual Studio. I named the new solution ThemeDemo.

We start working on the web server. It will have a web service to query for available themes as well as a repository of themes to download. First lets add the themes. Right click on the ClientBin folder and select Add existing item… from popup menu. Next add all theme dlls from the SIlverlight toolkit, mine where in the following folder:

%ProgramFiles%\Microsoft SDKs\Silverlight\v5.0\Toolkit\dec11\Themes

Change the Copy to output directory property for all theme dlls to Copy if newer.

Next we add the web service. Add a new item and select the Web Service template. Call the new service ThemeWebService. The web service should return a list of available themes so lets implement one that does:

[WebMethod]
public string[] GetThemes()
{
    string path = Path.GetDirectoryName(Assembly.GetExecutingAssembly().CodeBase);
    path += @"\ClientBin";
    path = path.Replace(@"file:\", "");

    string[] themeFiles = Directory.GetFiles(path, "System.Windows.Controls.Theming.*.dll");
    return themeFiles.Select(f =&amp;gt; Path.GetFileName(f).Replace(".dll", "")).ToArray();
}

That is it for the web server.

Figure 2: Web project.

Let’s move on to the client. Add a reference to System.Windows.Controls.Theming.Toolkit dll, mine are located here:

%ProgramFiles%\Microsoft SDKs\Silverlight\v5.0\Toolkit\dec11\Bin\System.Windows.Controls.Theming.Toolkit.dll

Also add a service reference to our web service. I named the service reference ThemeServiceReference.

Add some random controls to the MainPage. One should be a combobox for themes. The Toolkit comes with a Theme control which allows us to bind a Uri for a theme. Your code for  mainpage should look something like this:

&amp;lt;UserControl x:Class="ThemeDemo.MainPage"
    xmlns="http://schemas.microsoft.com/winfx/2006/xaml/presentation"
    xmlns:x="http://schemas.microsoft.com/winfx/2006/xaml"
    xmlns:d="http://schemas.microsoft.com/expression/blend/2008"
    xmlns:mc="http://schemas.openxmlformats.org/markup-compatibility/2006"
    xmlns:toolkit="http://schemas.microsoft.com/winfx/2006/xaml/presentation/toolkit"
    mc:Ignorable="d"
    d:DesignHeight="300" d:DesignWidth="300"&amp;gt;

    &amp;lt;toolkit:Theme ThemeUri="{Binding Path=ThemeLoader.SelectedThemeUri}"&amp;gt;
        &amp;lt;Grid x:Name="LayoutRoot"&amp;gt;
            &amp;lt;Grid.RowDefinitions&amp;gt;
                &amp;lt;RowDefinition Height="Auto" /&amp;gt;
                &amp;lt;RowDefinition Height="Auto" /&amp;gt;
                &amp;lt;RowDefinition Height="Auto" /&amp;gt;
                &amp;lt;RowDefinition Height="Auto" /&amp;gt;
            &amp;lt;/Grid.RowDefinitions&amp;gt;
            &amp;lt;Grid.ColumnDefinitions&amp;gt;
                &amp;lt;ColumnDefinition Width="Auto" /&amp;gt;
            &amp;lt;/Grid.ColumnDefinitions&amp;gt;

            &amp;lt;Slider Grid.Row="0" /&amp;gt;

            &amp;lt;CheckBox Grid.Row="1" Content="Check me" /&amp;gt;

            &amp;lt;Button Grid.Row="2" Content="Click me" /&amp;gt;

            &amp;lt;StackPanel Grid.Row="3" Orientation="Horizontal"&amp;gt;
                &amp;lt;TextBlock Text="Themes: " /&amp;gt;
                &amp;lt;ComboBox
                    ItemsSource="{Binding Path=ThemeLoader.ThemeNames}"
                    SelectedItem="{Binding Path=ThemeLoader.SelectedThemeName}"
                    SelectionChanged="OnChangeTheme"
                    Width="200" /&amp;gt;
            &amp;lt;/StackPanel&amp;gt;

        &amp;lt;/Grid&amp;gt;
    &amp;lt;/toolkit:Theme&amp;gt;

&amp;lt;/UserControl&amp;gt;
[public partial class MainPage : UserControl
{
    public MainPage()
    {
        InitializeComponent();

        ThemeLoader = new ThemeLoader("ShinyBlue");

        DataContext = this;
    }

    public ThemeLoader ThemeLoader { get; private set; }

    private void OnChangeTheme(object sender, SelectionChangedEventArgs e)
    {
        string theme = (sender as ComboBox).SelectedItem as string;
        ThemeLoader.SelectTheme(theme);
    }
}

Figure 3: Application project.

What is this ThemeLoader class? It is a utility class which contains necessary client side code to download themes.

public class ThemeLoader : INotifyPropertyChanged
{
    public ThemeLoader()
    {
        _proxy.GetThemesCompleted += OnGetThemesCompleted;
        _proxy.GetThemesAsync();
    }

    public ThemeLoader(string defaultThemeName)
        : this()
    {
        _defaultThemeName = defaultThemeName;
    }

    public IEnumerable ThemeNames
    {
        get { return _themes.Keys; }
    }

    private Uri _selectedThemeUri;
    public Uri SelectedThemeUri
    {
        get { return _selectedThemeUri; }
        private set
        {
            _selectedThemeUri = value;
            if (PropertyChanged != null)
            {
                PropertyChanged(this, new PropertyChangedEventArgs("SelectedThemeUri"));
            }
        }
    }

    private string _selectedThemeName;
    public string SelectedThemeName
    {
        get { return _selectedThemeName; }
        private set
        {
            _selectedThemeName = value;
            if (PropertyChanged != null)
            {
                PropertyChanged(this, new PropertyChangedEventArgs("SelectedThemeName"));
            }
        }
    }

    #region INotifyPropertyChanged Members
    public event PropertyChangedEventHandler PropertyChanged;
    #endregion INotifyPropertyChanged Members

    public void SelectTheme(string themeName)
    {
        if (!_themes.ContainsKey(themeName))
        {
            return;
        }

        string theme = _themes[themeName];

        Assembly[] loadedAssemblies = AppDomain.CurrentDomain.GetAssemblies();
        if (loadedAssemblies.Any(a =&amp;gt; GetName(a) == theme))
        {
            SelectedThemeUri = new Uri(string.Format("{0};component/Theme.xaml", theme), UriKind.RelativeOrAbsolute);
            SelectedThemeName = themeName;
            return;
        }

        Action onThemeLoaded =
            () =&amp;gt;
            {
                SelectedThemeUri = new Uri(string.Format("{0};component/Theme.xaml", theme), UriKind.RelativeOrAbsolute);
                SelectedThemeName = themeName;
            };
        WebClient webClient = new WebClient();
        webClient.OpenReadCompleted += new OpenReadCompletedEventHandler(OnAssemblyOpened);
        webClient.OpenReadAsync(new Uri(string.Format("{0}.dll", theme), UriKind.Relative), onThemeLoaded);
    }

    private void OnGetThemesCompleted(object sender, GetThemesCompletedEventArgs e)
    {
        _themes = e.Result.ToDictionary(k =&amp;gt; k.Replace("System.Windows.Controls.Theming.", ""), v =&amp;gt; v);

        if (PropertyChanged != null)
        {
            PropertyChanged(this, new PropertyChangedEventArgs("ThemeNames"));
        }

        if (_themes.ContainsKey(_defaultThemeName))
        {
            SelectTheme(_defaultThemeName);
        }
    }

    private static void OnAssemblyOpened(object sender, OpenReadCompletedEventArgs e)
    {
        AssemblyPart assemblyPart = new AssemblyPart();
        Assembly assembly = assemblyPart.Load(e.Result);

        string theme = GetName(assembly);
        Action onThemeLoaded = e.UserState as Action;
        if (onThemeLoaded != null)
        {
            onThemeLoaded();
        }
    }

    private static string GetName(Assembly assembly)
    {
        return new AssemblyName(assembly.FullName).Name;
    }

    private ThemeWebServiceSoapClient _proxy = new ThemeWebServiceSoapClient();
    private Dictionary _themes = new Dictionary();
    private string _defaultThemeName;
}

ThemeLoader implements INotifyPropertyChanged to be bindable. The class has a constructor which takes a default theme. ThemeLoader uses our web service to find out which themes are available for download.

A view uses the method SelectTheme() to load a theme. If the theme is already loaded then it will be used directly, otherwise it will be asynchronously downloaded using OpenReadAsync.

Once the theme is downloaded, the properties SelectedThemeUri and SelectedThemeName are updated. These are the properties that the view will bind to.

Download full code sample here.

July 8, 2011

Marching Ants border for WPF

Filed under: C#,WPF — Patric Johansson @ 5:13 PM

Marching Ants is a famous visualisation to show some kind of selection. It is commonly used in various image editing software but can also be useful in other scenarios to draw attention to some part of the screen. WPF uses a dotted border to show which control has focus, but in a highly themed applications it is often hard to detect those little dots. Instead lets use Marching Ants to show which control has focus.


Below is a ContentControl called MarchingAntsBorder which draws a border with a Marching Ants animation when its content has focus. The class has a couple of properties to tweak its appereance.

using System;
using System.Linq;
using System.Windows;
using System.Windows.Controls;
using System.Windows.Media;
using System.Windows.Media.Animation;
using System.Windows.Shapes;

namespace MarchingAntsDemo
{
    [TemplatePart(Name = "PART_Rectangle", Type = typeof(Rectangle))]
    public class MarchingAntsBorder : ContentControl
    {
        static MarchingAntsBorder()
        {
            DefaultStyleKeyProperty.OverrideMetadata(typeof(MarchingAntsBorder),
                                                     new FrameworkPropertyMetadata(typeof(MarchingAntsBorder)));
        }

        public Brush BorderBrush
        {
            get { return (Brush)GetValue(BorderBrushProperty); }
            set { SetValue(BorderBrushProperty, value); }
        }

        public static readonly DependencyProperty BorderBrushProperty =
            DependencyProperty.Register("BorderBrush", typeof(Brush), typeof(MarchingAntsBorder), new UIPropertyMetadata(Brushes.Red));

        public double BorderThickness
        {
            get { return (double)GetValue(BorderThicknessProperty); }
            set { SetValue(BorderThicknessProperty, value); }
        }

        public static readonly DependencyProperty BorderThicknessProperty =
            DependencyProperty.Register("BorderThickness", typeof(double), typeof(MarchingAntsBorder), new UIPropertyMetadata(1D));

        public double CornerRadius
        {
            get { return (double)GetValue(CornerRadiusProperty); }
            set { SetValue(CornerRadiusProperty, value); }
        }

        public static readonly DependencyProperty CornerRadiusProperty =
            DependencyProperty.Register("CornerRadius", typeof(double), typeof(MarchingAntsBorder), new UIPropertyMetadata(0D));

        // Only DoubleCollections with one single item are supported.
        public DoubleCollection StrokeDashArray
        {
            get { return (DoubleCollection)GetValue(StrokeDashArrayProperty); }
            set { SetValue(StrokeDashArrayProperty, value); }
        }

        public static readonly DependencyProperty StrokeDashArrayProperty =
            DependencyProperty.Register("StrokeDashArray", typeof(DoubleCollection), typeof(MarchingAntsBorder), new UIPropertyMetadata(new DoubleCollection() {2}));

        protected override void OnIsKeyboardFocusWithinChanged(DependencyPropertyChangedEventArgs e)
        {
            Rectangle PART_Rectangle = this.GetTemplateChild("PART_Rectangle") as Rectangle;
            if (PART_Rectangle != null)
            {
                if ((bool)e.NewValue)
                {
                    PART_Rectangle.Visibility = Visibility.Visible;
                   
                    DoubleAnimation doubleAnimation = new DoubleAnimation();
                    doubleAnimation.From = 0.0;
                    doubleAnimation.To = StrokeDashArray.Single() * 2;
                    doubleAnimation.Duration = new Duration(TimeSpan.FromSeconds(1.0));
                    doubleAnimation.AutoReverse = false;
                    doubleAnimation.RepeatBehavior = RepeatBehavior.Forever;
                    PART_Rectangle.BeginAnimation(Shape.StrokeDashOffsetProperty, doubleAnimation);
                }
                else
                {
                    PART_Rectangle.Visibility = Visibility.Hidden;
                    PART_Rectangle.BeginAnimation(Shape.StrokeDashOffsetProperty, null);
                }
            }

            base.OnIsKeyboardFocusWithinChanged(e);
        }
    }
}

Add its default template to a resource directory named Generic.xaml under a Themes folder.
This is the standard place for WPF to look for styles defining a template when it loads a control.

xmlns="<a href="http://schemas.microsoft.com/winfx/2006/xaml/presentation">http://schemas.microsoft.com/winfx/2006/xaml/presentation</a>"
                    xmlns:x="<a href="http://schemas.microsoft.com/winfx/2006/xaml">http://schemas.microsoft.com/winfx/2006/xaml</a>"
                    xmlns:local="clr-namespace:MarchingAntsDemo">

   
        <Setter Property="FocusVisualStyle" Value="{x:Null}" />
        <Setter Property="Template">
            <Setter.Value>
                <ControlTemplate TargetType="{x:Type local:MarchingAntsBorder}">
                    <Grid>
                        <ContentPresenter
                            Content="{TemplateBinding Content}" />
                        <Rectangle
                            Name="PART_Rectangle"
                            Visibility="Hidden"
                            Fill="Transparent"
                            Stroke="{TemplateBinding BorderBrush}"
                            StrokeThickness="{TemplateBinding BorderThickness}"
                            RadiusX="{TemplateBinding CornerRadius}"
                            RadiusY="{TemplateBinding CornerRadius}"
                            StrokeDashArray="{TemplateBinding StrokeDashArray}" />                      
                    </Grid>
                </ControlTemplate>
            </Setter.Value>
        </Setter>
    </Style>

</ResourceDictionary>

Example of usage:

<MarchingAntsDemo:MarchingAntsBorder BorderBrush="Yellow" BorderThickness="2" CornerRadius="5" StrokeDashArray="2">
<Button Content="Button with Marching Ants border to indicate focus" FocusVisualStyle="{x:Null}" />
</MarchingAntsDemo:MarchingAntsBorder>

Finally, some tips. You should set FocusVisualStyle to null in your default styles for controls so you don’t have to set it directly on each control like above. The MarchingAntsBorder can also be added to the control template in your default styles so you don’t need to wrap each control with one.

November 1, 2005

Commenting code

Filed under: Uncategorized — Patric Johansson @ 3:36 PM

Today’s Daily WTF is about code commenting where the comment describes what the code does. What’s wrong with that? First of all, code should be self describing as much as possible. Keep your code well structured and as simple as possible, use declarative variable and method names so it can be read and understood without any explaining comments. This is possible with most code, except some really tricky algorithm implementations which will be easier to read with some guiding comments. I usually find it valuable in these cases to add a full example with some values showing how the algorithm transforms these values, step by step.

So does that mean I don’t comment my code? Not at all, I comment a lot. But I try to add comments that instead of explaining what the code does, instead explains why it does it. You should assume that anyone reading your code understands the language, so you don’t need to explain that part of the program for them. For example, this is an example of an unnecessary comment:
m_nRow++; // Increase m_nRow with 1.
Instead, here’s a more useful comment:
m_nRow++; // m_nRow comes from a zero based index and this class assumes that first row is row number one and not zero.

Instead of describing what to do we describe why we do it. Programmers who don’t get the increment operator should not be let near your code anyway.

Another useful place for comments is to help programmers see hard to spot pitfalls when doing changes to the code. When writing code we always do tradeoffs because of workload or deadlines and usually our classes are highly specialized for its precise purpose. There are usually a lot of cases that are not handled, since these cases can not occur. However, when someone later changes the code, these cases just might be something that suddenly is not just theoretical problems. A common example is of course threading, that your class is not threadsafe since its not used by more than one thread, but later this is changed and no one know that your class wasn’t threadsafe.

So our code comments should serve three purposes: explain why the code is how it is, point out pitfalls and finally explain difficult code parts. Out of these, the two first comment types are the most common.

Comments can serve one more purpose, and that is when changing other programmer’s code. I usually add comments to other’s code before changing it. This way forces me to really go through the code and understand it before I attempt to change it. I usually read it while debugging it to make sure it works as I think it does. The commenting forces me to express my understanding of the code in words which will make it very obvious if I understand it or not. It’s hard to write a descriptive comment about something you don’t get. The better a program is structured; the easier it is to write comments for it and of course, the opposite is true as well. But after adding the comments I comprehend the code better than if I just had read it.

October 23, 2005

Can Linq be successful?

Filed under: Uncategorized — Patric Johansson @ 5:20 PM

I developed a couple of applications with relational databases using the traditional way of sending SQL strings to the database. The problem with this approach is of course that your SQL strings are never verified at compile time, instead first at runtime will you know if they are syntactically correct. If you have chosen to work with a strongly typed language like C# you most likely favor compile time verification before runtime verification.

In one project where we had strong financial backing and high demands of quality we eliminated this risk with SQL strings by using a code generator called Persistence which would generate access classes to manipulate our database. This meant we would use classes with proper methods to update and manipulate rows and columns in the database tables without having to use any SQL strings. These SQL strings were of course there, but they were automatically generated from the database and encapsulated in these access classes. I’m not sure if Persistence still exists as a product or as a company. The company behind the product, Persistence Software was acquired last year by Progress Software. I’m not sure if they killed Persistemce or what happened to it.

Microsoft has an excellent database in SQL Server and some first-rate programming languages, but no good mapping between them. Since Microsoft owns these languages it didn’t need to do it the Persistence way with code generators, instead Microsoft can and will add access capabilities directly to these languages or more correctly to the CLR. This will be part of the next C# version (3.0) and will be part of the Visual Studio code named Orca and is called Linq which comes in different implementations. So far there’s DLinq for querying relational data and XLinq for querying XML.The only existing DLinq implementation is the one for SQL Server. I believe that for DLinq to be really successful there need to be an Oracle implantation as well. I’m sure there’s possible to hack one together using ODBC or some other Oracle API, but to get good performance it need to be built into its query engine, that is directly into Oracle. This is of course nothing that Microsoft or any third party can do on their own; this is a job for Oracle themselves. However, Oracle is not the most supportive of Microsoft and will likely try to hinder DLinq from getting popular. Unless there’s a huge demand for integrated DLinq support in Oracle by some large users, I don’t see Oracle helping out Microsoft voluntarily. And without DLinq fully working with Oracle I don’t see it as becoming the standard way of developing database applications for Windows. Microsoft must get Oracle to add full integrated DLinq support in its database.

So Microsoft have a real dilemma here. In order to make DLinq a success it needs Oracle to support it. However Oracle will only support it if it’s already a success and its user demands it. A classic catch 22 situation. Let’s hope that Microsoft and Oracle can work together on this one.

October 22, 2005

Charles Petzold asks if Visual Studio Rot your mind?

Filed under: Uncategorized — Patric Johansson @ 12:09 AM

Yesterday, Charles Petzold spoke at the NYC .NET Developers Group on the topic "Does Visual Studio Rot the Mind?". I was of course there to hear everyone’s favorite Win32 book author. It was a very entertaining lecture, held totally without any use of PowerPoint or any code examples. Instead he discussed the differences between how we program .NET today with Visual Studio and how it was done in the days of 16bits Windows using C and a simple text editor. Petzold made a point that Visual Studio will force you to program in a certain way and you don’t really have a choice. IntelliSense will suggest what code you want to type next. Code generators and wizards will create your classes and implement large parts of them for you. If your application needs a GUI you will use the Form Designer to draw your form without writing any code. Petzold continued with describing how he missed having to do all the coding himself and be in full control of the resulting code. However, he pointed out we have no choice today. The first Windows API contained around 400 methods. The API for Windows95 contained little over 1 000. .NET 2.0 framework contains around 60 000 public methods and properties. So IntelliSense is a must to find a suitable methods to use, there’s no way anyone can learn them all like before. Automatic code generation and using form designers is also a must for a programmer to be competitive today, everyone else are using them so you will just be considered to be a slow coder instead of a careful programmer who’s in control of his code if you don’t use them.

Petzold said he just finished writing a book called "Programming Microsoft Windows Forms" and just started on his next project, a book about the Windows Presentation Foundation (WPF). Petzold said that he fought WPF was the future but not yet with Visual Studio 2005. Lots of things are missing still like the common dialogs, Open File dialog for example. Even if this is fixed in future versions, for smaller projects WinForms will still be the prefered way, just because dealing with XAML is just not worth it. WinForms are good enough in many cases.

September 16, 2005

Expand MDI child windows to not overlap each others

Filed under: C#,WinForms — Patric Johansson @ 6:08 PM

MDI applications are great for applications with many windows which need to be displayed at the same time next to each other. Normally the user will have to size and arrange the child windows so they don’t cover each other but uses maximum available space. No one likes any grey wasted space in between, desktop real estate is expensive

A class called MDIChildExpander will handle the work of calculating how much exactly we can expand each child window. Let’s start with some screenshots so we understand the concept. Below is a picture of a normal MDI application where there is lots of wasted space in between each child window.

We expand the middle window, in this application it is done by double clicking on the window’s client area, see second picture below.

We continue and expand each window and end up with the following layout, see last picture below.

No more grey dead wasted space! And its easy to use. In the class for a child window, add a private variable for an MDIChildExpander object:

private MDIChildExpander expander;

Next, in the constructer of the child window class, create it:

expander = new MDIChildExpander(this);

Then allow the user somehow to expand the window and then call the following code:

expander.Expand();

Not so hard to use, don’t you agree? The MDIChildExpander is however more complex, but I tried to make it more understandable by some well placed comments. And now with no further ado, I give to you the :MDIChildExpander class.

using System;
using System.Windows.Forms;
using System.Drawing;

public class MDIChildExpander
{
    private Form child;

       public MDIChildExpander(Form child)
       {
        this.child = child;
    }

    static private bool Overlap(int x1, int x2, int y1, int y2)
    {
        // Returns true if two lines overlap each other. x1 and x2 is start and end position for first line.
        // y1 and y2 is start and end position for second line.

        return (x1 >= y1 && x1 < y2) || 
                (x2 > y1 && x2 <= y2) ||
                (y1 >= x1 && y1 < x2) || 
                (y2 > x1 && y2 <= x2);
    }

    static private bool HorizontalOverlap(Rectangle rect1, Rectangle rect2)
    {
        // Returns true if rect1 is right above or right below rect2. The below two
        // rectangles horizontally overlap each other.
        //
        //   XXX
        //   XXX
        //
        //      XXX 
        //      XXX 

        return Overlap(rect1.Left, rect1.Right, rect2.Left, rect2.Right);
    }

    static private bool VerticalOverlap(Rectangle rect1, Rectangle rect2)
    {
        // Returns true if rect1 is directly to the left or right of rect2. The below two
        // rectangles vertically overlap each other.
        //
        //   XXX   XXX
        //   XXX   XXX
                   
        return Overlap(rect1.Top, rect1.Bottom, rect2.Top, rect2.Bottom);
    }

    public void Expand()
    {
        // We will modify a Rectangle object which is a copy of the child’s bounds to fill the biggest
        // possible space without overlapping any other child window. If the child window already overlaps
        // another child window, we will continue to overlap it.

        // childCausesHorizontalScrollBar and childCausesVerticalScrollBar will be true if the child window is 
        // the only window outside the visible area of the MDI container main window and is responsible for 
        // causing the main window to display a scrollbar. In that case when resizing the child window we will
        // move it and resize it to fit within the visible area. This will of course remove the need of a scrollbar.
        // However, if some other child window is also outside the visible are, the scrollbar will still be there
        // after axpansion and the corresponding variable will be false. So they will only be true if the child window
        // is the only cause for a scrollbar.

        Rectangle childRect = child.Bounds;

        // Adjust top if possible.

        int topNew = 0;;
        foreach (Control control in child.Parent.Controls)
        {
            Form otherForm = control as Form;
            
            if (otherForm != null && otherForm != child)
            {
                // Check if child overlaps horizontally and that the child is below the other form and if that other form
                // is below any previous found windows.

                if (HorizontalOverlap(childRect, otherForm.Bounds) &&
         childRect.Top >= otherForm.Bottom &&
         otherForm.Bottom > topNew)
                {
                    topNew = otherForm.Bottom;
                }
            }
        }

        // Increase height and move window.

        childRect.Height += childRect.Top – topNew; 
        childRect.Y = topNew;
    
        bool childCausesHorizontalScrollBar = 
           child.Left < 0 ||
           child.Right > child.Parent.Bounds.Right; 

        // Adjust bottom if possible.

        int bottomNew = child.Parent.ClientSize.Height;
        foreach (Control control in child.Parent.Controls)
        {
            Form otherForm = control as Form;
            if (otherForm != null && otherForm != child)
            {
                // Check if forms overlap horizontally and that the form is above the other form and if that other form
                // is above any previous found windows.

                if (HorizontalOverlap(childRect, otherForm.Bounds) && 
          childRect.Bottom <= otherForm.Top && 
          otherForm.Top < bottomNew)
                {
                    bottomNew = otherForm.Top;
                }

                childCausesHorizontalScrollBar &= 
           otherForm.Left >= 0 && 
           otherForm.Right <= child.Parent.Bounds.Right; ;
            }
        }

        // Increase height.

        childRect.Height += bottomNew – child.Bottom; 

        if (childCausesHorizontalScrollBar && 
      bottomNew == child.Parent.ClientSize.Height)
        {
            // We need to expand it some more.

                childRect.Height += 
           System.Windows.Forms.SystemInformation.HorizontalScrollBarHeight;
        }

        // Adjust left side if possible.

        int leftNew = 0;
        foreach (Control control in child.Parent.Controls)
        {
            Form otherForm = control as Form;
            if (otherForm != null && otherForm != child)
            {
                // Check if forms overlap vertically and that the form is right of the other form and if that other form
                // is more right than any previous found windows.

                if (VerticalOverlap(childRect, otherForm.Bounds) &&
          childRect.Left >= otherForm.Right &&
          otherForm.Right > leftNew)
                {
                    leftNew = otherForm.Right;
                }
            }
        }

        // Increase width and move window.

        childRect.Width += childRect.Left – leftNew; 
        childRect.X = leftNew;
    
        bool childCausesVerticalScrollBar = 
           child.Top < 0 || 
           child.Bottom > child.Parent.Bounds.Bottom; 

        // Adjust right side if possible.

        int rightNew = child.Parent.ClientSize.Width;
        foreach (Control control in child.Parent.Controls)
        {
            Form otherForm = control as Form;
            if (otherForm != null && otherForm != child)
            {
                // Check if forms overlap vertically and that the form is left of the other form and if that other form
                // is more left than any previous found windows.

                if (VerticalOverlap(childRect, otherForm.Bounds) &&
          childRect.Right <= otherForm.Left &&
          otherForm.Left < rightNew)
                {
                    rightNew = otherForm.Left;
                }

                childCausesVerticalScrollBar &=  
                        otherForm.Top >= 0 ||
                        otherForm.Bottom <= child.Parent.Bounds.Bottom; 
            }
        }

        // Increase width.

        childRect.Width += rightNew – child.Right; 

        if (childCausesVerticalScrollBar &&
      rightNew == child.Parent.ClientSize.Width)
        {
            // We need to expand it some more.

            childRect.Width += 
         System.Windows.Forms.SystemInformation.VerticalScrollBarArrowHeight;
        }

        // Update child window with new bounds.

        child.Bounds = childRect;

        if (childCausesHorizontalScrollBar && 
      child.Right != childRect.Right &&
      child.Width > childRect.Width)
        {
            // When moving the child window from the non visible part of the window and resizing it, we may end
            // up trying to resize the window to smaller than Windows allows. This can only happen when the window
            // was previously partly hidden and solely caused a scrollbar to be displayed. We need to move it some
            // more then to fit within the main MDI container window.

            child.Left -= child.Width – childRect.Width;
        }

        if (childCausesVerticalScrollBar && 
      child.Bottom != childRect.Bottom && 
      child.Height > childRect.Height)
        {
            // When moving the child window from the non visible part of the window and resizing it, we may end
            // up trying to resize the window to smaller than Windows allows. This can only happen when the window
            // was previously partly hidden and solely caused a scrollbar to be displayed. We need to move it some

            // more then to fit within the main MDI container window.

            child.Top -= child.Height – childRect.Height;
        }
    }
}
Next Page »

Blog at WordPress.com.